This article covers community suggested gameplay tips and formation layouts to optimize combat efficiency.
- This article should not be taken as a definitive guide, any tips or layouts here are merely suggestions
Feel free to use your own strategies and/or go with what suits your playstyle the most!
1. In general, stick to 3 DPSers (MG/AR/RF), and at least 1 SMG. For the 5th member, use a 2nd SMG if you're up against a difficult boss, otherwise an HG will be more resource efficient. 2. MGs typically do less dps than RFs and ARs buffed by SMGs when battles get lengthy (ie boss battles), and almost the same dps for shorter battles. (Consider this after the fact that they eat up 3x more ammo than RFs...) 3. An AR buffed by 1 SMG will typically match the dps of an RF, and an AR buffed by 2 SMGs will outdps an RF. 4. RFs have a problem of always targeting the same mob and suffer from many wasted overkill shots; not a good thing when their RoF is so slow. 3 ARs will typically end a non-boss battle sooner than 3 RFs. [Edit] With the last update, this problem seems to have been solved by the RFs seemingly knowing if another RF is about to kill their target and will switch to another target before the target has died. (Just an observation)
5. Typically your tanks will receive much less damage if they avoid the front row.
This is because the time it takes for the enemies to move into firing position will be longer, and your own squad won't need to move forward to fire at enemy RFs if they're the ones who need to move towards you.
It's most efficient to make a formation where all 3 of your DPSers start in the back row. If you're needing to move them all to the back at the beginning of every battle you will be losing a few seconds of potential dps. 6. High level HGs can be used as secondary tanks, and will be able to hold their own if you leave them in the same row as your SMG.

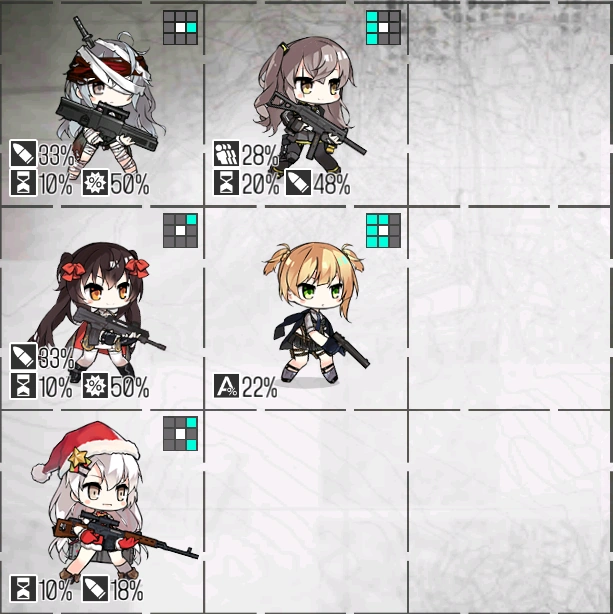
- Taking the above points into consideration, the formation pictured with the HG in the middle is very recommended if you're not feeling lazy and can swap the positions of the SMG and the HG at the start of every battle.
- Otherwise if you are lazy, leave the HG at top.
7. With the addition of SGs, feel free to use them in regular mob battles, but you'll want to stick with SMGs against bosses.
Bosses have an average of 150 firepower, and the highest armor an SG w/ equips is only going to have 35, so they'll just be sitting there taking 115dmg per shot, while an SMG would have more than a 50% chance of dodging them. 8. For player Tdolls, damage received does not carry over to other dummies. (If an x2 girl has 400 total HP and she takes two 150dmg shots, she'd be left with one dummy at 200 HP.)
Because of this, prioritize evasion over HP against bosses, since no Tdoll in the game can take more than 2 150dmg shots per dummy. 9. Once your squad is high enough (lv90+) you can use 3RFs 2HGs in most battles. Your RFs will be taking out the backline hard hitters before they're able to shoot at your HGs, and your HGs will easily be able to dodge frontline mobs.
Mobs to take caution over when using this formation are Dragoons (purple haired enemies that look like they're riding a mech). Dragoons have high specs in every stat including movement speed; they're able to dish out accurate and high damage shots in a very short amount of time. You'll want tanks with high hp instead of evasion against Dragoons.
- Kiting
All enemies have a noticeable delay between when they first get into position, and when they take their first shots.
The windup length differs between different types of enemies; RFs have the most noticeable delay.
Exploiting this, a kiting method can be done against them that involves putting your tank in the front line, and right before they take their first shot, move your tank back to the 2nd line and immediately back to the front line.
This will cause the RFs to move just a hair and reset their windup process; delaying their first shots.
Kiting is essential in night battles against Nemeums, those armored walking cannons encountered in night maps that take forever to windup their shots. You'll be able to finish a battle without them ever firing a single shot by kiting them.
Also note that if you're using an F patterned formation like in the above images, moving a tank to the front, letting all enemies target her, and then moving her back to the middle line, will make more enemies shoot at that one tank and decrease the chances of stray enemies targeting your bottomleft DPSer.
- Animation Canceling
All bosses except for Destroyer, the EP.5 boss, have some sort of special attack that can be canceled by kiting them.
You'll notice that they will stop attacking for a few seconds before doing their specials; that's when you should kite them with your tank.
Preferably try to do it at the last split second to maximize the time of them not attacking.
- Hell Run (KR: 지옥런)
A controversial combat tip originating from South Korea. In short, the player arranges an echelon into one x5 T-Doll and four Level 1 T-Dolls, then starts combat. After combat, when the four level 1 T-Dolls get severely damaged, the user retires the T-Dolls or uses them as power-up resources without healing them.